Irresistible True Butter Tarts: A Sweet Canadian Classic for You
Butter tarts hold a special place in the hearts of Canadian dessert lovers.
This beloved treat is much more than just a pastry; it is a sweet symbol deeply tied to Canada’s rich traditions.
With its gooey filling and flaky crust, it captures the attention of anyone who enjoys delicious sweets.
For years, both home bakers and pastry experts have crafted their own unique takes on this treasured dessert.
Different regions and family secrets add layers of flavor and meaning to butter tarts across Canada.
They bring together feelings of comfort, nostalgia, and timeless baking methods in one irresistible package that continues to please taste buds everywhere in the nation.
Why True Butter Tarts Are A Classic Treat
What Goes In True Butter Tarts
Pastry Base:Filling Ingredients:Optional Mix-Ins:How To Make True Butter Tarts Easily
Step 1: Prepare Pastry Dough
In a food processor, pulse together:Add cold butter and shortening, pulsing until mixture looks like tiny pebbles. Drizzle ice water and stir with a fork until dough barely comes together. Avoid overmixing.
Divide dough into two rounds, wrap in plastic wrap, and chill in refrigerator for half an hour.
Step 2: Shape Tart Shells
Roll out dough on lightly floured surface. Cut into 4-inch circles. Gently press into muffin tin. Return to refrigerator while preparing filling.
Step 3: Create Decadent Filling
Whisk together in mixing bowl:Step 4: Fill and Garnish
Sprinkle optional mix-ins like raisins or chopped nuts into bottom of each tart shell. Pour filling until shells are two-thirds full.
Step 5: Bake to Golden Perfection
Place muffin tin on bottom oven rack. Bake at 425°F for 12-15 minutes until edges turn golden brown.
Step 6: Cool and Serve
Allow tarts to cool completely in pan. Transfer to wire rack. Serve and enjoy these classic Canadian treats.
Smart Tips For True Butter Tarts
How To Store True Butter Tarts Without A Mess
Great Pairings For True Butter Tarts
Yummy Variations Of True Butter Tarts
True Butter Tarts FAQs
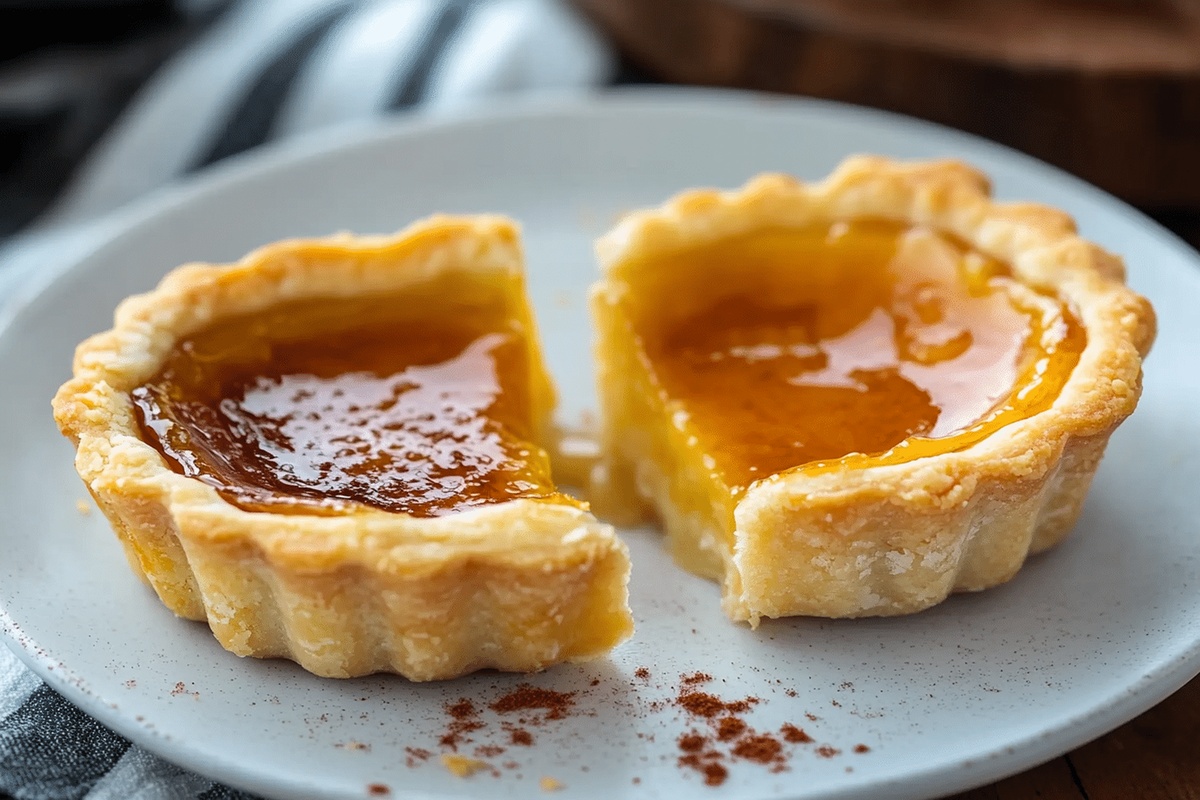
Butter tarts are a classic Canadian dessert featuring a flaky pastry shell filled with a sweet, gooey mixture of brown sugar, corn syrup, butter, and eggs, often including raisins or other mix-ins.
They’re unique to Canada, but somewhat similar to pecan pie or chess pie, with a rich, sweet filling in a pastry crust. Unlike those, butter tarts have a more runny, liquid-like filling.
The consistency depends on how long they’re baked. A shorter baking time creates a more liquid filling, while a longer bake results in a firmer, more set texture. Personal preference plays a big role in this variation.
Yes! The recipe is straightforward. The key is to not overwork the dough and to follow the chilling instructions carefully. Even beginner bakers can create delicious butter tarts with some patience and attention to detail.
Print
Savory True Butter Tarts Recipe
- Total Time: 1 hour
- Yield: 12 1x
Description
Sweet Canadian Classic Butter Tarts bring maple-infused nostalgia to your dessert table with their rich, golden filling and flaky pastry shell. Delicate yet indulgent, you’ll savor each bite of this beloved Canadian treat that promises pure culinary comfort.
Ingredients
Main Ingredients:
- 1 cup butter (½ cup cold, cubed + ¼ cup melted)
- 1 egg
- 2 ¼ cups all-purpose or pastry flour
Sweeteners and Syrups:
- 1 ½ tablespoons brown sugar (1 tablespoon + ½ cup lightly packed)
- ½ cup corn syrup
- 1 teaspoon vanilla extract
Additional Ingredients:
- ½ teaspoon salt (½ teaspoon in flour + ¼ teaspoon in filling)
- 6 tablespoons ice water (or as needed)
- ½ cup cold shortening, cubed
- ½ cup raisins (or substitute with pecans, walnuts, or chocolate chips)
Instructions
- Prepare the pastry foundation by combining flour, brown sugar, and salt in a food processor, creating a uniform dry mixture.
- Introduce cold butter and shortening to the dry ingredients, pulsing until the texture resembles coarse, pebble-like crumbs.
- Gradually incorporate ice water, gently mixing until the dough barely coheres, being careful to avoid excessive manipulation.
- Separate the dough into two distinct portions, encase each in plastic wrap, and allow to rest in the refrigerator for half an hour.
- On a lightly dusted surface, roll out the chilled dough and delicately cut into circular shapes sized approximately 4 inches in diameter.
- Carefully position the dough circles into a muffin tin, pressing gently to form shells, then return to the refrigerator while preparing the filling.
- Craft the filling by whisking together brown sugar, corn syrup, melted butter, egg, vanilla extract, and a pinch of salt until smooth and well-integrated.
- Distribute raisins or preferred mix-ins across the bottom of each pastry shell, creating a delicate foundation.
- Pour the syrup mixture into the shells, filling each approximately two-thirds full to prevent overflow during baking.
- Position the muffin tin on the bottom rack of a preheated oven at 425°F (220°C), allowing the tarts to bake for 12-15 minutes until golden and slightly bubbling.
- Remove from the oven and permit the tarts to cool completely within the tin, then transfer to a wire rack for serving.
- Serve and savor these delectable butter tarts at room temperature, enjoying their rich, caramelized flavor.
Notes
- Keep ingredients cold for the flakiest, most tender pastry crust, especially the butter and water.
- Use unsalted butter to control the salt content and prevent over-salting the delicate tart shells.
- Don’t overwork the dough when mixing, as this develops gluten and makes the crust tough instead of delicate.
- Experiment with mix-ins like chopped pecans, chocolate chips, or coconut to add interesting texture
- Prep Time: 45 minutes
- Cook Time: 15 minutes
- Category: Desserts
- Method: Baking
- Cuisine: Canadian
Nutrition
- Serving Size: 12
- Calories: 250
- Sugar: 18 g
- Sodium: 150 mg
- Fat: 14 g
- Saturated Fat: 8 g
- Unsaturated Fat: 4 g
- Trans Fat: 0 g
- Carbohydrates: 30 g
- Fiber: 1 g
- Protein: 2 g
- Cholesterol: 40 mg
Sophia Rivera
Recipe Developer & Kitchen Tips Specialist
Expertise
Education
Austin Community College
San Antonio Culinary Institute
Sophia’s passion for baking began in her family kitchen, where she spent hours experimenting with new recipes. With a background in baking and pastry arts, she loves making desserts that are as visually stunning as they are delicious.
Sophia is all about using seasonal, locally sourced ingredients to create treats that everyone will enjoy. When she’s not creating mouth-watering desserts, you can find her gardening, making new recipes, or enjoying a relaxing afternoon with her family.