Irresistibly Tangy Lemon Curd Tartlets: A Zesty Sweet Treat
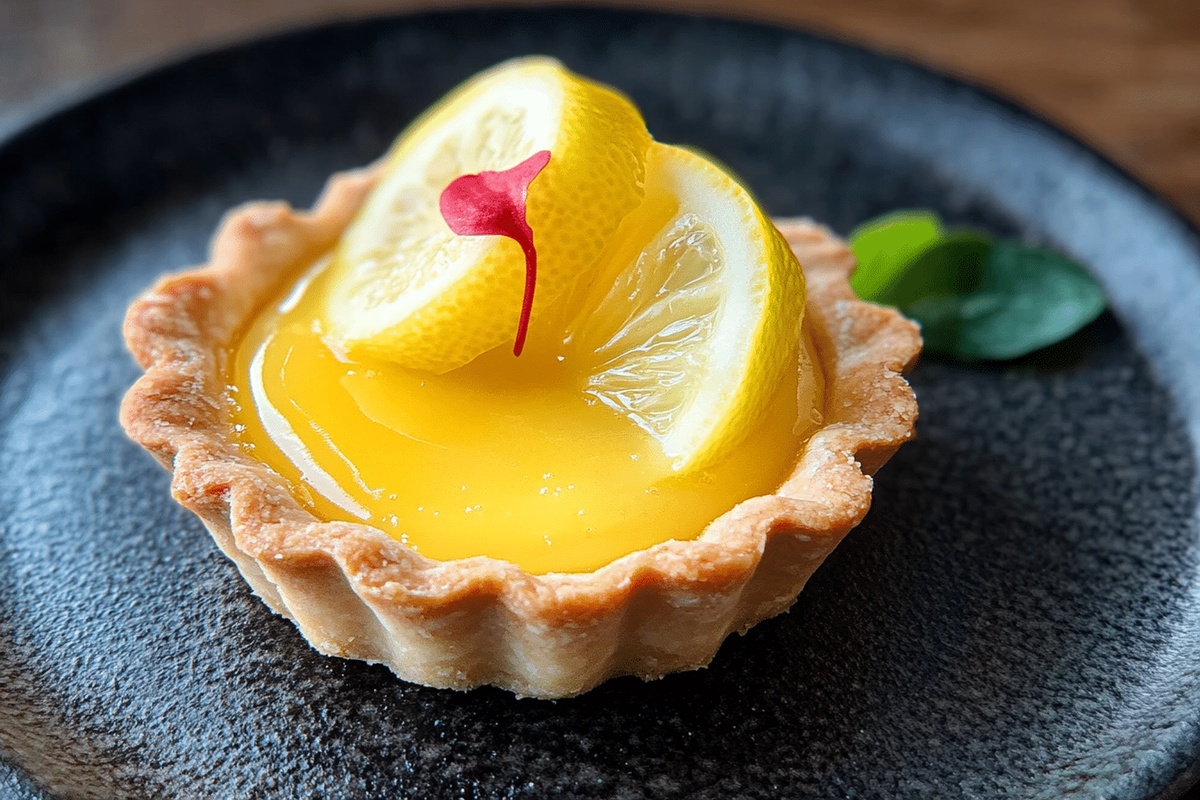
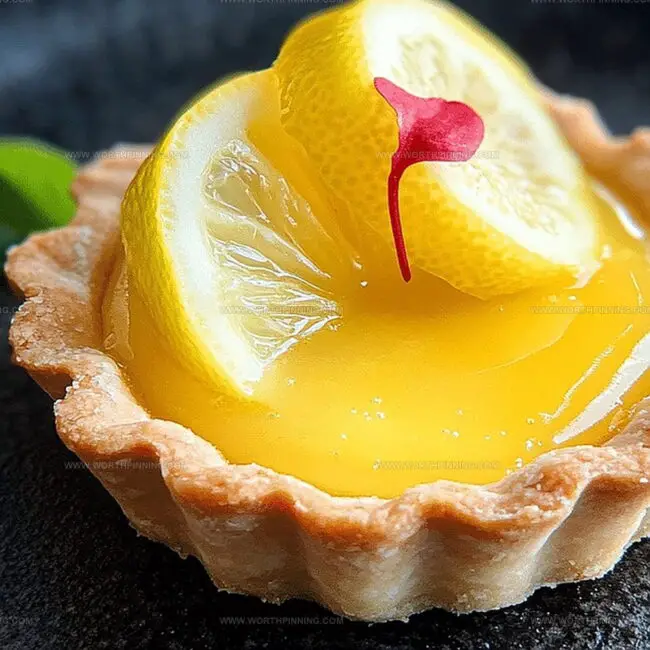
Lemon curd tartlets are miniature desserts bursting with bright, zesty flavors.
These small pastries offer a perfect mix of buttery, crisp shells and silky smooth citrus filling.
Elegant and charming, they bring to mind a classic French-inspired treat that appeals to those who love sophisticated sweets.
The sweet and tangy notes blend together in a way that feels both rich and refreshing.
Both seasoned bakers and beginners enjoy making these tiny delights because of their beautiful appearance.
These tartlets make an eye-catching centerpiece for afternoon tea or as a special dessert just for you.
Why Lemon Curd Tartlets Always Impress
What You Need For Lemon Curd Tartlets
Pastry Base:Fat and Binding:Lemon Curd Filling:Making Lemon Curd Tartlets Step-By-Step

Step 1: Mix Dry Crumbs
Grab a food processor and toss in flour, powdered sugar, and a pinch of salt. Pulse these ingredients until they’re perfectly combined.
Step 2: Incorporate Butter Chunks
Drop cold butter cubes into the processor and pulse until the mixture looks like fine, sandy crumbs.
Step 3: Bind With Egg
Whisk an egg in a separate bowl, then slowly drizzle it into the processor while pulsing. Keep going until the dough begins to clump together.
Step 4: Create Pastry Disc
Roll the dough between two sheets of parchment paper until it’s about 4mm thick. Shape into a smooth ball and slide into the refrigerator for at least an hour.
Step 5: Shape Tart Shells
Remove dough from refrigerator and cut out circular shapes using a round cutter slightly wider than your muffin pan openings.
Step 6: Prepare Tartlet Molds
Gently press dough circles into the muffin pan, making sure they touch all sides and eliminate air pockets.
Step 7: Chill Tartlet Shells
Return the muffin pan to the refrigerator for another 2 hours or overnight.
Step 8: Prep For Baking
Preheat oven to 160°C (325°F) and poke small holes in tartlet bottoms using a fork.
Step 9: Blind Bake Shells
Step 10: Create Lemon Curd Base
In a saucepan over low heat, whisk together:Stir for 3-5 minutes until slightly thickened.
Step 11: Build Creamy Texture
Gradually add butter cubes, whisking until each melts. Stir in lemon zest.
Step 12: Develop Curd Consistency
Continue cooking on low heat for 5-15 minutes, whisking constantly until curd thickens.
Step 13: Test Curd Readiness
Dip a spoon’s back into the curd. Run your finger through it. If the path remains clear, it’s ready.
Step 14: Fill Tartlet Shells
Pour warm lemon curd into cooled tartlet shells.
Step 15: Remove Air Bubbles
Gently tap tartlets against a hard surface.
Step 16: Final Chill
Refrigerate for 2-3 hours before serving.
Simple Tips For Lemon Curd Tartlets
How To Keep And Reheat Lemon Curd Tartlets
Toppings And Sides For Lemon Curd Tartlets
Ways To Change Lemon Curd Tartlets
FAQ About Lemon Curd Tartlets
Cold butter creates flaky, tender layers by preventing the fat from fully melting during mixing, which helps the pastry maintain its delicate texture.
When you run your finger through the back of a spoon coated with curd, the line should remain clear and separated. If the curd flows back together, it needs more cooking time.
Yes, you can prepare the tart shells up to 24 hours before filling. After blind baking, store them in an airtight container at room temperature until you’re ready to fill with lemon curd.
Chilling helps prevent shrinkage during baking, relaxes the gluten, and ensures a more stable and crisp pastry shell by keeping the butter cold and preventing it from melting too quickly.
Print
Luscious Lemon Curd Tartlets Recipe
- Total Time: 1 hour
- Yield: 12 1x
Description
Delicate “Lemon Curd Tartlets” dance with zesty sunshine on delicate pastry shells, promising pure culinary elegance. French bakery magic meets citrus brightness, inviting you to savor each delightful, creamy bite of tangy Mediterranean charm.
Ingredients
Main Ingredients:
- 250 grams (8.8 ounces) all-purpose flour
- 120 grams (4.2 ounces) unsalted butter, cold and cubed
- 4 egg yolks
- 125 milliliters (4.2 fluid ounces) lemon juice
Sweeteners:
- 100 grams (3.5 ounces) caster sugar
- 50 grams (1.8 ounces) icing sugar, sifted
Finishing and Seasoning Ingredients:
- 1 pinch fine salt
- 1 large egg, at room temperature
- 75 grams (2.6 ounces) unsalted butter, at room temperature
- Zest of 1 lemon (optional)
Instructions
- Craft a delicate pastry foundation by blending flour, powdered sugar, and salt in a food processor until uniformly combined.
- Introduce chilled butter cubes and pulse until the mixture transforms into fine, sandy crumbs.
- Gently incorporate a whisked egg, pulsing intermittently until the dough coheres into a loose, malleable mass.
- Shape the dough into a compact sphere, then roll between parchment sheets to approximately 4mm thickness.
- Refrigerate the rolled dough for a minimum of one hour to enhance its structural integrity.
- Extract dough disks using a round or fluted cutter, ensuring they marginally exceed the muffin pan’s dimensions.
- Meticulously press dough into muffin cavities, eliminating potential air pockets and ensuring complete surface contact.
- Return the prepared pan to the refrigerator for an extended chilling period of 2-3 hours.
- Preheat the oven to 160°C and perforate tartlet bases with a fork to prevent unwanted rising.
- Temporarily freeze the muffin pan while the oven reaches temperature.
- Line each tartlet with parchment and fill with ceramic weights or dried beans.
- Bake initially for 15 minutes with weights, then remove and continue baking until achieving a golden-brown hue.
- Allow shells to cool completely at room temperature.
- Construct the lemon curd by whisking egg yolks, sugar, and citrus juice in a saucepan over gentle heat.
- Gradually integrate butter cubes, ensuring complete melting between additions, and incorporate lemon zest.
- Maintain constant whisking while cooking, allowing the mixture to thicken progressively over low heat.
- Test curd consistency by running a finger through the mixture on a spoon’s reverse – it should maintain a distinct separation.
- While still warm, carefully pour the curd into cooled tartlet shells.
- Eliminate potential air bubbles by gently tapping the pan against a stable surface.
- Refrigerate for several hours to facilitate complete setting before serving.
Notes
- Swap out wheat flour for gluten-free alternatives like almond or rice flour to make tartlets suitable for those with gluten sensitivities.
- Reduce sugar content by using stevia or monk fruit sweetener for a lower-calorie dessert option.
- Enhance tartlet texture by chilling dough and shells thoroughly, ensuring a crisp and flaky base that prevents soggy bottoms.
- Balance lemon curd’s tartness by adjust
- Prep Time: 30 minutes
- Cook Time: 30 minutes
- Category: Desserts, Snacks
- Method: Baking
- Cuisine: British
Nutrition
- Serving Size: 12
- Calories: 250
- Sugar: 14g
- Sodium: 50mg
- Fat: 15g
- Saturated Fat: 9g
- Unsaturated Fat: 4g
- Trans Fat: 0g
- Carbohydrates: 30g
- Fiber: 1g
- Protein: 3g
- Cholesterol: 80mg
Sophia Rivera
Recipe Developer & Kitchen Tips Specialist
Expertise
Education
Austin Community College
San Antonio Culinary Institute
Sophia’s passion for baking began in her family kitchen, where she spent hours experimenting with new recipes. With a background in baking and pastry arts, she loves making desserts that are as visually stunning as they are delicious.
Sophia is all about using seasonal, locally sourced ingredients to create treats that everyone will enjoy. When she’s not creating mouth-watering desserts, you can find her gardening, making new recipes, or enjoying a relaxing afternoon with her family.