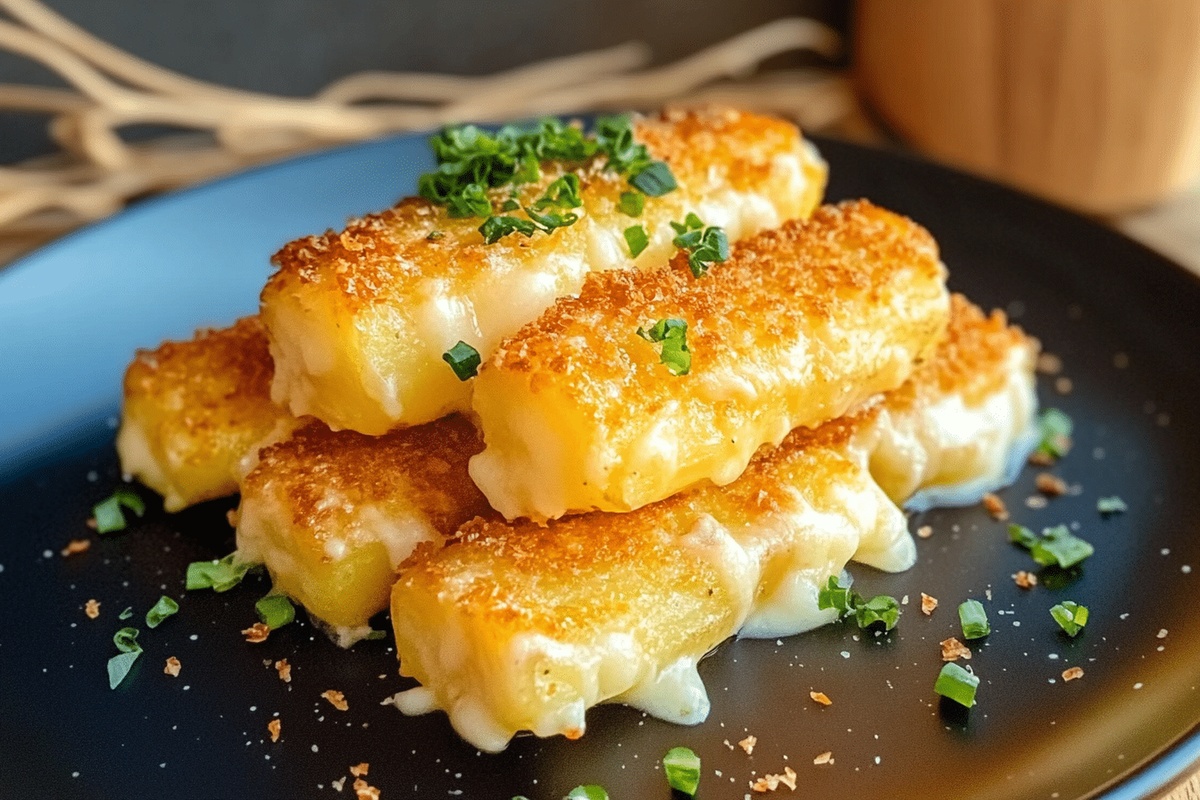
Irresistibly Gooey Loaded Potato and Cheese Sticks You’ll Crave
Crispy potato and cheese sticks are a tasty appetizer that hits the spot for comfort food lovers.
These snacks mix the hearty flavors of potatoes and melted cheese inside a crunchy shell.
People who love cooking enjoy how this recipe turns simple ingredients into something everyone wants to eat.
The blend of smooth potatoes and stretchy cheese makes an amazing mix of textures and tastes that kids and adults will both enjoy.
Perfectly seasoned, these potato and cheese sticks can make any meal feel special or work as a standalone snack for casual dining with friends.
Crunchy on the outside yet soft within, these sticks promise an experience that combines classic comfort with exciting flavors.
What’s So Good About Loaded Potato And Cheese Sticks
What You’ll Need For Loaded Potato And Cheese Sticks
Base Ingredients:Cheese and Filling Components:Coating and Binding Ingredients:Easy Guide To Make Loaded Potato And Cheese Sticks

Step 1: Prepare Potato Base
Gather these ingredients:Mash all ingredients in a large mixing bowl until mostly smooth, keeping some potato chunks for an interesting texture.
Step 2: Create Cheese Centers
Cut cheddar cheese into thin strips approximately quarter-inch thick.
Step 3: Form Potato Pockets
Scoop a spoonful of potato mixture and shape into a round ball.
Carefully insert a cheese strip into the center of each potato ball.
Wrap potato mixture completely around the cheese, ensuring full coverage.
Step 4: Create Crispy Coating
Roll each potato stick in flour.
Dunk into beaten egg.
Cover thoroughly with panko breadcrumbs for an extra crunchy exterior.
Step 5: Prepare Baking Surface
Position oven rack in middle position.
Preheat oven to 400°F.
Place coated potato sticks on baking sheet.
Drizzle with olive oil.
Sprinkle with salt.
Step 6: Bake Golden
Slide baking sheet into preheated oven.
Bake until golden brown and cheese begins melting, approximately 15 minutes.
Step 7: Fry for Extra Crunch
Heat cooking oil to 350°F in deep pan.
Carefully lower potato sticks into hot oil.
Fry until exterior turns crispy golden brown, about 3 minutes.
Step 8: Final Touches
Transfer fried sticks to drying rack.
Season with additional salt.
Allow to cool slightly before serving.
Step 9: Serve and Enjoy
Present immediately while warm and crispy.
Watch guests devour these delectable potato cheese sticks!
Little Tips For Loaded Potato And Cheese Sticks

How To Keep Loaded Potato And Cheese Sticks Tasty
Great Matches For Loaded Potato And Cheese Sticks
Change Up Loaded Potato And Cheese Sticks Your Way
All You Need To Know About Loaded Potato And Cheese Sticks
No, these potato sticks contain bacon, making them non-vegetarian. To make a vegetarian version, you can omit the bacon or replace it with vegetarian bacon alternatives.
Yes, you can experiment with various cheeses like mozzarella, pepper jack, or Swiss. Just ensure the cheese melts well and complements the potato flavor.
The key is to follow the breading process carefully: first coat in flour, then dip in beaten egg, and finally roll in panko breadcrumbs. This creates a crisp, golden exterior when baked or fried.
You can prepare the potato sticks up to the breading stage and refrigerate them for a few hours before cooking. Just be sure to cook them fresh for the best texture and flavor.
Print
Easy Loaded Potato and Cheese Sticks Recipe
- Total Time: 45 minutes
- Yield: 4 1x
Description
Crispy Loaded Potato and Cheese Sticks deliver comfort straight from grandma’s kitchen, packed with rich flavors and creamy potato goodness. Cheese pulls and golden-brown edges invite hungry diners to savor this irresistible snack that promises pure satisfaction.
Ingredients
Main Ingredients:
- 3 russet potatoes, cooked and cubed
- 1 block cheddar cheese, cut into ¼-inch strips
- ¼ cup bacon, diced
Flavor Enhancers:
- ½ cup sour cream
- ¼ cup green onion, diced
- 1 teaspoon salt
- ½ teaspoon pepper
Coating Ingredients:
- Flour
- Egg
- Panko breadcrumbs
- Oil, for frying
- Salt, to season
Instructions
- Craft a creamy potato base by blending warm mashed potatoes with tangy sour cream, crispy bacon bits, freshly chopped green onions, and a seasoning of salt and pepper.
- Maintain a rustic texture by partially mashing the mixture, leaving some delightful potato chunks for added complexity.
- Slice premium cheddar cheese into precise strips, approximately quarter-inch thick, ready for incorporation.
- Scoop generous portions of the potato mixture and shape into compact, uniform spheres.
- Carefully nestle a cheese strip into the center of each potato sphere, meticulously enveloping the cheese completely to prevent leakage during cooking.
- Create a triple-layer coating by first rolling each potato sphere in fine flour, then dipping into whisked eggs, and finally encrusting with crisp panko breadcrumbs for maximum crunch.
- Heat the oven to a precise 400°F, preparing for initial baking.
- Arrange the breaded potato sticks on a lined baking sheet, drizzling with a light touch of olive oil and sprinkling with a pinch of sea salt.
- Bake until the exterior achieves a golden, appetizing hue and the internal cheese begins to melt enticingly.
- Simultaneously prepare a deep fryer or heavy-bottomed pan, heating oil to 350°F for secondary crisping.
- Submerge the potato sticks in hot oil, frying until they transform into a rich, amber-brown color with a perfectly crisp exterior.
- Extract the sticks and place on a wire rack, allowing excess oil to drain while seasoning with an additional light salt sprinkle.
- Permit a brief cooling period to prevent potential mouth burns, allowing the molten cheese interior to stabilize.
- Present immediately, serving as an irresistible appetizer or snack that promises a harmonious blend of crispy exterior and creamy interior.
Notes
- Customize potato texture by leaving chunks for rustic, homemade feel and added bite.
- Ensure cheese is fully enclosed within potato mixture to prevent melting and leaking during cooking.
- Use room temperature ingredients for smoother mixing and better binding of potato mixture.
- Experiment with different cheese varieties like smoked gouda or pepper jack for unique flavor profiles.
- Prep sticks ahead of time and freeze unbaked for convenient make-ahead appetizer or
- Prep Time: 30 minutes
- Cook Time: 15 minutes
- Category: Snacks, Appetizer
- Method: Frying
- Cuisine: American
Nutrition
- Serving Size: 4
- Calories: 350
- Sugar: 2 g
- Sodium: 600 mg
- Fat: 22 g
- Saturated Fat: 10 g
- Unsaturated Fat: 9 g
- Trans Fat: 0 g
- Carbohydrates: 30 g
- Fiber: 3 g
- Protein: 12 g
- Cholesterol: 50 mg
Sophia Rivera
Recipe Developer & Kitchen Tips Specialist
Expertise
Education
Austin Community College
San Antonio Culinary Institute
Sophia’s passion for baking began in her family kitchen, where she spent hours experimenting with new recipes. With a background in baking and pastry arts, she loves making desserts that are as visually stunning as they are delicious.
Sophia is all about using seasonal, locally sourced ingredients to create treats that everyone will enjoy. When she’s not creating mouth-watering desserts, you can find her gardening, making new recipes, or enjoying a relaxing afternoon with her family.