Indulge in Our Creamy 3-Cheese Garlic Bread Pizza Dip Tonight!
Cheese lovers will adore this Garlic Bread Pizza Dip, a perfect blend of two favorite flavors.
This dish combines the best parts of comfort food into one irresistible appetizer that brings excitement to any event.
Creamy cheese mixes beautifully with fragrant garlic and classic pizza toppings for a taste sensation.
Whether you’re hosting a party or making snacks for family night, this recipe is easy to make and sure to satisfy guests of all ages.
Warm, gooey textures meet bold, savory notes that turn an ordinary starter into something special.
It’s a fun twist on traditional Italian dishes, offering maximum flavor in every delicious bite.
Why 3-Cheese Garlic Bread Pizza Dip Is A Winner
3-Cheese Garlic Bread Pizza Dip rocks your gathering game!
What Goes In 3-Cheese Garlic Bread Pizza Dip
Main Ingredients:
Bread and Cheese:Sauce and Seasonings:Garnish and Optional Extras:How To Make 3-Cheese Garlic Bread Pizza Dip Step By Step
Step 1: Warm Up the Oven
Crank the oven to a toasty 400°F. Grab a well-loved cast-iron skillet or an oven-safe dish. Arrange golden garlic rolls in a beautiful circular pattern around the dish’s edges.
Step 2: Create Cheese Magic
In a mixing bowl, combine:Blend these ingredients until they become a smooth, creamy mixture that promises deliciousness.
Step 3: Build Your Flavor Masterpiece
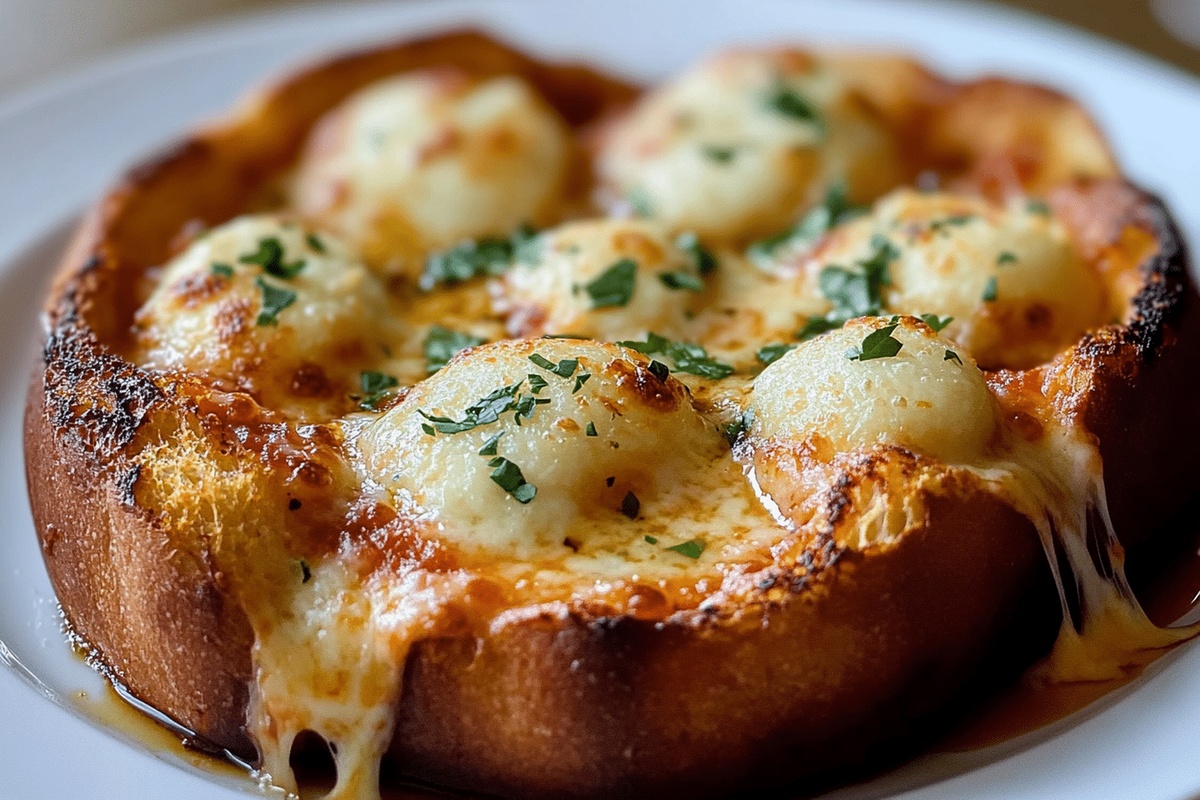
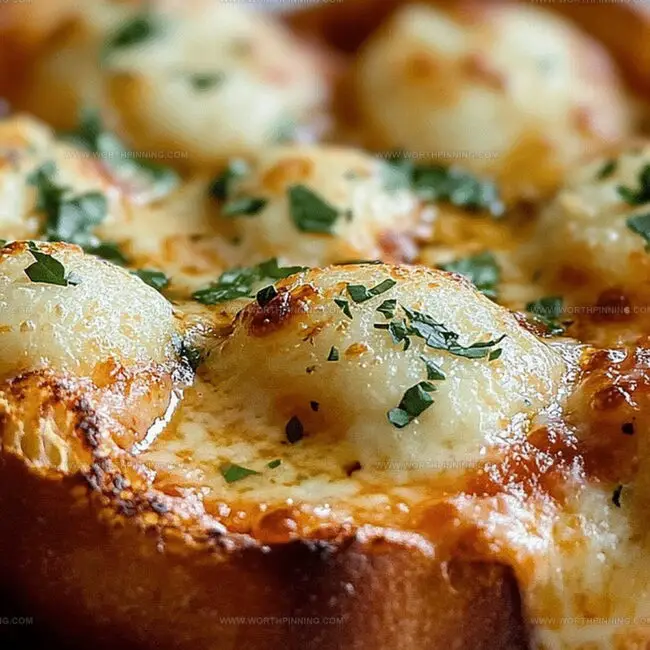
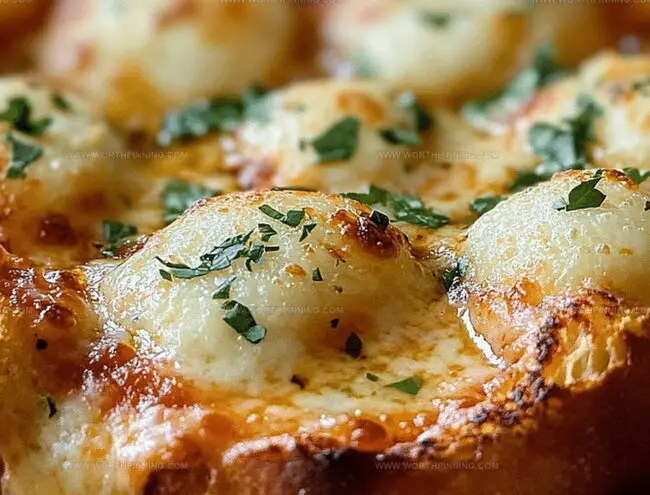
Spread the cheese blend into the center of your dish, filling the spaces between those tempting garlic rolls. Drizzle pizza sauce across the top. Sprinkle additional mozzarella and a touch more oregano to crown your creation.
Step 4: Bake to Perfection
Slide the dish into the oven and let it transform for about 30 minutes. Watch for a golden, bubbly top that signals pure deliciousness is ready. Optional: Scatter some fresh herbs on top for an extra pop of color and flavor.
Serve immediately while the cheese is still gloriously melted and stretchy. Prepare for serious snack happiness!
Simple Tips For 3-Cheese Garlic Bread Pizza Dip
How To Keep 3-Cheese Garlic Bread Pizza Dip Warm
What To Pair With 3-Cheese Garlic Bread Pizza Dip
Tasty Variations For 3-Cheese Garlic Bread Pizza Dip
3-Cheese Garlic Bread Pizza Dip FAQs
Yes, you can swap cheeses like using gouda instead of cheddar or adding fontina for extra flavor. Just maintain similar quantities to keep the recipe balanced.
Absolutely! It’s perfect for game nights, potlucks, or casual gatherings. The combination of garlic bread and cheesy dip makes it a crowd-pleaser that guests will love.
Look for golden-brown edges on the cheese and garlic rolls, and a bubbly surface. When the cheese is melted and slightly crispy around the edges, it’s ready to serve.
You can prepare the cheese mixture and assemble the dip earlier in the day, then refrigerate. Just add 5-10 minutes to the baking time when cooking from cold to ensure it’s heated through completely.
Print
Easy 3-Cheese Garlic Bread Pizza Dip Recipe
- Total Time: 40 minutes
- Yield: 8 1x
Description
Indulgent 3-Cheese Garlic Bread Pizza Dip merges pizza passion with comforting appetizer magic. Melted cheese, zesty herbs, and golden crisp bread edges create an irresistible Mediterranean-inspired party starter you’ll crave at first bite.
Ingredients
Main Ingredients:
- 1 bag (8) frozen garlic rolls, thawed
- 1 (8 ounces/226 grams) package cream cheese, room temperature
- 6 ounces (170 grams) fresh mozzarella, divided (cut or shredded)
- 1 cup shredded cheddar cheese
- ¼ cup freshly shredded Parmesan cheese
Sauce and Seasoning:
- 1 cup pizza sauce
- 1 ½ teaspoons dried oregano, divided
Garnish:
- Fresh herbs (optional)
Instructions
- Initiate the thermal preparation by heating the oven to a precise 400°F, creating an ideal environment for transforming your ingredients into a delectable appetizer.
- Strategically position garlic-infused rolls around the perimeter of a well-seasoned cast-iron skillet or robust oven-safe vessel, establishing a structural foundation for the forthcoming culinary creation.
- Craft a luxurious cheese amalgamation by thoroughly blending cream cheese, mozzarella, cheddar, and Parmesan with a sprinkle of aromatic oregano until the mixture achieves a smooth, uniform consistency.
- Meticulously distribute the cheese blend into the central region of the dish, ensuring an even layer that nestles between the garlic knots.
- Generously cascade pizza sauce across the cheese foundation, creating a vibrant flavor landscape.
- Crown the dip with an additional layer of mozzarella and a delicate dusting of oregano, promising enhanced visual and gustatory appeal.
- Transfer the assembled masterpiece into the preheated oven, allowing it to transform for approximately 30 minutes until the surface achieves a golden, effervescent complexion.
- Optional: Embellish with freshly chopped herbs to elevate the visual and aromatic profile.
- Serve immediately while the cheese remains irresistibly molten, inviting immediate indulgence.
Notes
- Select a cast-iron skillet or ceramic dish that can withstand high oven temperatures for even heat distribution and crispy edges.
- Opt for high-quality cheeses like freshly grated Parmesan and whole milk mozzarella for richer, more complex flavor profiles.
- Enhance the dip’s versatility by adding cooked Italian sausage, pepperoni, or chopped roasted vegetables for extra protein and texture.
- Prep Time: 10 minutes
- Cook Time: 30 minutes
- Category: Appetizer, Snacks
- Method: Baking
- Cuisine: Italian
Nutrition
- Serving Size: 8
- Calories: 250
- Sugar: 3g
- Sodium: 600mg
- Fat: 15g
- Saturated Fat: 9g
- Unsaturated Fat: 4g
- Trans Fat: 0g
- Carbohydrates: 22g
- Fiber: 1g
- Protein: 10g
- Cholesterol: 40mg
Sophia Rivera
Recipe Developer & Kitchen Tips Specialist
Expertise
Education
Austin Community College
San Antonio Culinary Institute
Sophia’s passion for baking began in her family kitchen, where she spent hours experimenting with new recipes. With a background in baking and pastry arts, she loves making desserts that are as visually stunning as they are delicious.
Sophia is all about using seasonal, locally sourced ingredients to create treats that everyone will enjoy. When she’s not creating mouth-watering desserts, you can find her gardening, making new recipes, or enjoying a relaxing afternoon with her family.