
Fluffy Homemade Glazed Doughnuts Recipe: Sweet Morning Joy
Sweet memories of childhood bakery visits dance through my mind whenever I think about homemade glazed doughnuts.
Neighborhood cafes never matched the warm, pillowy magic I could create in my own kitchen.
Soft clouds of golden dough beckon with irresistible charm and nostalgia.
Light and airy textures promise delectable moments that melt on your tongue.
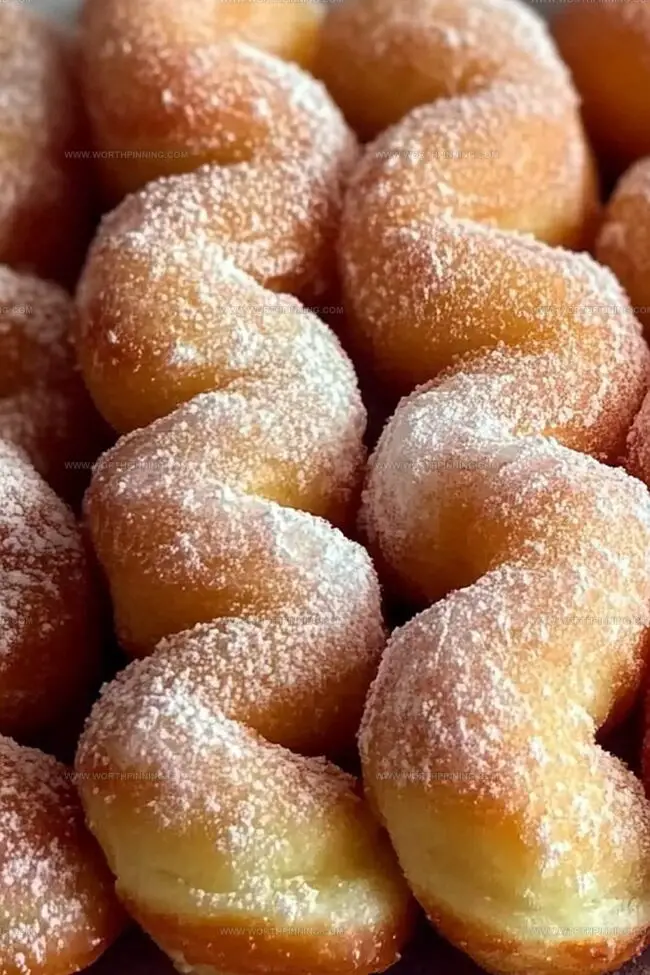
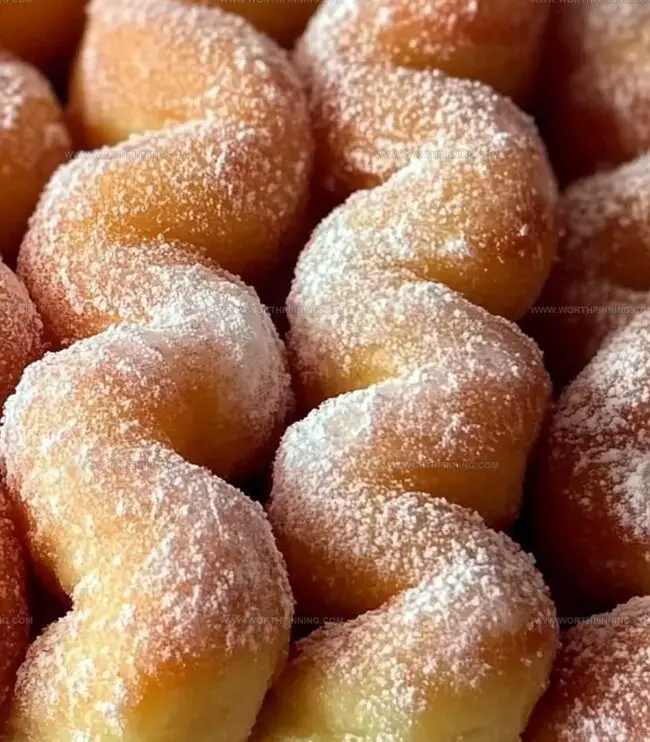
Crisp edges sealed with sugary glaze signal pure breakfast bliss.
Cinnamon whispers from the kitchen will draw everyone near these delightful treats.
Grab a mixing bowl and prepare to craft something spectacular that connects generations through simple, delicious comfort.
Homemade Glazed Doughnuts That Always Hit the Spot
What Goes into Homemade Glazed Doughnuts
Dough Ingredients:Leavening Agents:Binding and Moisture Ingredients:Frying and Finishing:Glaze Ingredients:Steps to Make Homemade Glazed Doughnuts at Home
Step 1: Activate Yeast Magic
Sprinkle yeast into warm water and let it bubble and wake up for 5-10 minutes until it looks frothy and alive.
Step 2: Create Dough Base
Blend all ingredients in a spacious mixing bowl until perfectly combined and smooth.
Step 3: Introduce Flour Power
Slowly incorporate flour into the wet mixture, stirring gently until a soft, pillowy dough emerges.
Step 4: Knead and Shape
Transfer dough onto a lightly dusted surface. Massage and stretch the dough for 5-7 minutes until it becomes silky and elastic.
Step 5: First Rise
Place dough in a greased bowl, shield with a clean cloth, and let it rest in a cozy spot for 1-1.5 hours until it doubles in volume.
Step 6: Roll and Cut
Spread dough to half-inch thickness. Use doughnut cutters or two circular cutters to create perfect doughnut shapes.
Step 7: Second Rise
Arrange cut doughnuts on a floured tray, cover with a light towel, and allow them to puff up for 30 minutes.
Step 8: Heat Oil
Fill a deep skillet with vegetable oil to about 2 inches. Warm oil to 350°F.
Step 9: Fry to Golden Perfection
Gently slide doughnuts into hot oil, cooking each side for approximately 1 minute until they turn a gorgeous golden brown. Drain on paper towels.
Step 10: Glaze and Celebrate
While doughnuts are still warm, dunk them in sweet glaze and place on a wire rack to set.
Smart Tips for Homemade Glazed Doughnuts
Storing Homemade Glazed Doughnuts the Right Way
Best Matches for Homemade Glazed Doughnuts
Ways to Reinvent Homemade Glazed Doughnuts
Answers to Homemade Glazed Doughnuts Questions
The yeast needs time to activate and become foamy, which indicates it’s alive and ready to help the dough rise properly, creating a light and fluffy texture for the doughnuts.
The dough is ready when it has doubled in size and looks puffy. When you gently press the dough with your finger, it should slowly spring back, showing it’s perfectly proofed.
Use a doughnut cutter if you have one, or two different-sized round cutters. The larger cutter makes the outer circle, and the smaller one creates the hole in the center, giving you that classic doughnut shape.
Drop a small piece of dough into the oil – if it sizzles and rises to the surface immediately, the oil is ready for frying. If it burns quickly or doesn’t sizzle, adjust the heat.
Print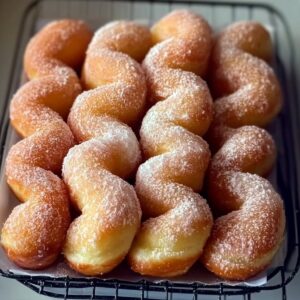
Homemade Glazed Doughnuts Recipe
- Total Time: 35 minutes
- Yield: 12 1x
Description
Delightful homemade glazed doughnuts bring pure comfort from grandma’s kitchen, melting hearts with golden-brown perfection. Crisp exterior and pillowy center promise sweet satisfaction that connects hungry souls to classic American baking tradition.
Ingredients
Main Ingredients:
- 2 ½ cups all-purpose flour (plus more for dusting)
- 1 large egg
- ¾ cup warm milk (about 110°F / 43°C)
- ¼ cup unsalted butter, melted
Leavening and Flavor Enhancers:
- 2 ¼ teaspoons (1 packet) active dry yeast
- 2 tablespoons warm water (about 110°F / 43°C)
- ¼ cup granulated sugar
- ½ teaspoon salt
Glaze Ingredients:
- 2 cups powdered sugar
- ¼ cup milk
- 1 teaspoon vanilla extract
- Vegetable oil, for frying
Instructions
- Activate the yeast by dissolving it in tepid water, allowing it to bloom and become frothy for approximately 5-10 minutes.
- Create a rich liquid base by whisking together warm milk, granulated sugar, salt, melted butter, egg, and the activated yeast mixture until thoroughly combined.
- Gradually incorporate flour into the liquid mixture, gently folding until a cohesive, soft dough emerges.
- Transfer the dough onto a lightly dusted work surface and knead methodically for 5-7 minutes, developing gluten and achieving a smooth, elastic consistency.
- Nestle the dough into a lightly greased bowl, envelop with a clean kitchen towel, and allow it to proof in a draft-free, warm environment until it doubles in volume, approximately 1-1.5 hours.
- After proofing, roll out the dough to a uniform 1/2-inch thickness and utilize circular cutters to shape doughnuts, creating distinctive rings and centers.
- Arrange the cut doughnuts on a floured tray, loosely drape with a soft cloth, and permit a secondary rise for 30 minutes to enhance their airiness.
- Heat vegetable oil in a deep skillet or heavy-bottomed pot to precisely 350°F, ensuring an optimal frying temperature.
- Gently lower doughnuts into the hot oil, frying in small batches and turning once to achieve a uniform golden-brown exterior, approximately 1 minute per side.
- Drain the freshly fried doughnuts on absorbent paper towels to remove excess oil.
- While still warm, immerse each doughnut into the prepared glaze, allowing excess to drip off before placing on a wire rack to set and develop a glossy finish.
Notes
- Activate yeast precisely by using water at the exact 110-115°F temperature to ensure proper proofing and prevent killing the yeast.
- Knead dough gently but thoroughly to develop gluten structure, creating a soft and tender doughnut texture with consistent elasticity.
- Let doughnuts rise in a draft-free, warm environment like a slightly heated oven to guarantee optimal volume and pillowy softness.
- Monitor oil temperature carefully during frying, using a candy thermometer to maintain consistent 350°F, preventing greasy or undercooked centers.
- Prep Time: 15 minutes
- Cook Time: 20 minutes
- Category: Breakfast, Snacks, Desserts
- Method: Frying
- Cuisine: American
Nutrition
- Serving Size: 12
- Calories: 500
- Sugar: 2 g
- Sodium: 800 mg
- Fat: 25 g
- Saturated Fat: 4 g
- Unsaturated Fat: 20 g
- Trans Fat: 0 g
- Carbohydrates: 45 g
- Fiber: 6 g
- Protein: 22 g
- Cholesterol: 40 mg
Ethan Miller
Founder & Lead Content Writer
Expertise
Education
Portland Community College
Culinary Institute of the Pacific
Ethan’s culinary journey began in his grandmother’s kitchen, where he first learned to play with flavors and ingredients. With formal training in culinary arts and a deep love for international cuisines, Ethan’s goal is to share the joy of cooking with others.
He believes food is all about creativity and bringing people together, one meal at a time. When he’s not experimenting with new dishes, he enjoys hiking in the Oregon wilderness and discovering fresh, local ingredients.